跳转至

配置、数据文件格式介绍

约 2859 个字 768 行代码 6 张图片 预计阅读时间 19 分钟

Info

这里默认以 Python 及基于此的模块介绍文件格式的读写、转换

如无特殊说明,均为默认情况,暂不考虑对解析器的定制

为什么用文件记录配置、数据?

  • 与代码分离,便于部署
  • 便于记录数据
  • 便于不同程序之间交换

为什么用特定的文本文件格式?

  • 有现成的解析工具
  • 编辑器支持
  • 文本格式便于编辑

常见的文件格式:

  • CSV(.csv
  • INI (.ini.conf、...)
  • JSON (.json
  • YAML (.yaml.yml
  • TOML (.toml
  • XML (.xml

CSV

逗号分隔值(Comma-Separated Values)

格式示例

desc,date,缺失1,缺失2,缺失3,缺失4,改善1,改善2,改善3,改善4,逾期1,逾期2,逾期3,逾期4
初始,,3,0,1,1,0,0,0,0,0,0,0,0
"13: 事业群1, D4.1, 
一般, 延期",2023/1/1 0:00,3,0,1,1,0,0,0,0,1,0,0,0
"12: 事业群2, D4.1, """"主要"""", 延期",2023/1/1 0:00,3,0,1,1,0,0,0,0,1,0,0,0
"11: 事业群1, D4.1, 关键, 关闭",2020/1/1 0:00,3,0,1,1,1,0,0,0,1,0,0,0
"10: 事业群2, C5.1, 风险, 关闭",2020/1/1 0:00,3,0,1,1,1,0,0,0,1,0,0,0
"7: 事业群1, C5.1, 一般, 延期",2023/1/1 0:00,3,0,1,1,1,0,0,0,2,0,0,0
"9: 事业群1, C5.2, 主要, 未整改",,3,0,1,1,1,0,0,0,3,0,0,0
"8: 事业群2, C5.2, 关键, 延期",2023/1/1 0:00,3,0,1,1,1,0,0,0,3,0,0,0
"4: 事业群2, C5.2, 一般, 关闭",2020/1/1 0:00,3,0,1,1,1,0,0,0,3,0,0,0
"5: 事业群1, C5.2, 主要, 关闭",2020/1/1 0:00,3,0,1,1,1,0,0,0,3,0,0,0
"6: 事业群2, C5.1, 关键, 未整改",,3,0,1,1,1,0,0,0,3,0,0,0
"2: 事业群2, B6.2, 一般, 关闭",2020/1/1 0:00,3,0,1,1,1,0,1,0,3,0,0,0
"3: 事业群1, C5.1, 风险, 关闭",2020/1/1 0:00,3,0,1,1,1,0,1,0,3,0,0,0
"1: 事业群1, A1.1, 风险, 延期",2023/1/1 0:00,3,0,1,1,1,0,1,1,3,0,0,1
  • 实际上相当于表格,存储的是二维及以下的数据:

    desc date 缺失1 缺失2 缺失3 缺失4 改善1 改善2 改善3 改善4 逾期1 逾期2 逾期3 逾期4
    初始 3 0 1 1 0 0 0 0 0 0 0 0
    13: 事业群1, D4.1, 一般, 延期 2023/1/1 0:00 3 0 1 1 0 0 0 0 1 0 0 0
    12: 事业群2, D4.1, ""主要"", 延期 2023/1/1 0:00 3 0 1 1 0 0 0 0 1 0 0 0
    11: 事业群1, D4.1, 关键, 关闭 2020/1/1 0:00 3 0 1 1 1 0 0 0 1 0 0 0
    10: 事业群2, C5.1, 风险, 关闭 2020/1/1 0:00 3 0 1 1 1 0 0 0 1 0 0 0
    7: 事业群1, C5.1, 一般, 延期 2023/1/1 0:00 3 0 1 1 1 0 0 0 2 0 0 0
    9: 事业群1, C5.2, 主要, 未整改 3 0 1 1 1 0 0 0 3 0 0 0
    8: 事业群2, C5.2, 关键, 延期 2023/1/1 0:00 3 0 1 1 1 0 0 0 3 0 0 0
    4: 事业群2, C5.2, 一般, 关闭 2020/1/1 0:00 3 0 1 1 1 0 0 0 3 0 0 0
    5: 事业群1, C5.2, 主要, 关闭 2020/1/1 0:00 3 0 1 1 1 0 0 0 3 0 0 0
    6: 事业群2, C5.1, 关键, 未整改 3 0 1 1 1 0 0 0 3 0 0 0
    2: 事业群2, B6.2, 一般, 关闭 2020/1/1 0:00 3 0 1 1 1 0 1 0 3 0 0 0
    3: 事业群1, C5.1, 风险, 关闭 2020/1/1 0:00 3 0 1 1 1 0 1 0 3 0 0 0
    1: 事业群1, A1.1, 风险, 延期 2023/1/1 0:00 3 0 1 1 1 0 1 1 3 0 0 1
  • 可带标题行也可不带,但处理时要注意。

  • 由于换行符的存在,一行不一定是表格中的一行。
  • 常用于数据交换和存储。

变体

CSV 根据分隔符、换行方式、空内容表示方法、双引号表示方法、特殊字符处理方式等,可以分为多种变体。

常用的是 Excel 变体,格式如下:

  • 以半角逗号分隔各列
  • 如果内容有逗号或换行符,用半角双引号包裹
  • 如果内容有半角双引号,则在前面的基础上双写内容中的半角双引号
  • 一行的换行符为 CRLF(\r\n

如果以制表符为分隔符,也可以称作 TSV。

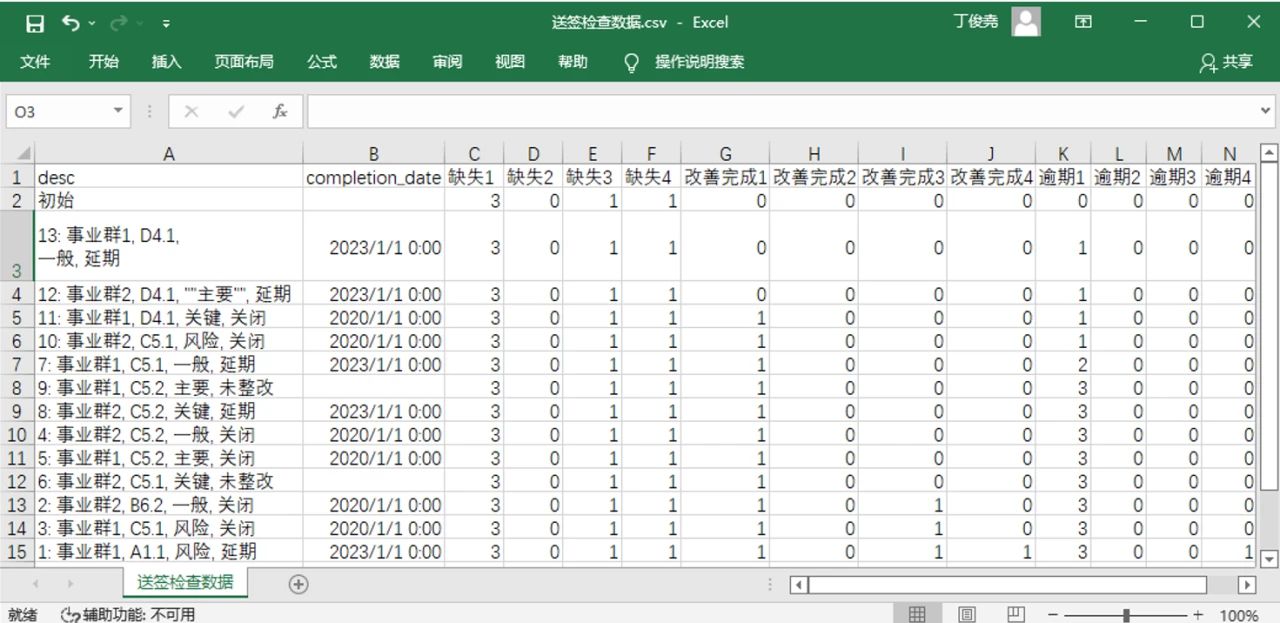
Excel 处理 CSV

Excel 变体的 CSV 文件可用 Excel 打开、编辑、储存。

Excel 打开 CSV 文件
Excel 打开 CSV 文件

如果有小数,使用 Excel 打开后,精度可能有丢失。

保存时需要选择“CSV UTF-8”,而非“CSV”,否则会以系统默认编码(如 GBK、Big5)储存。

保存 CSV 文件
保存 CSV 文件

即便如此,存储格式实际上为 UTF-8 带 BOM 的格式,而许多程序默认的 UTF-8 编码不带 BOM,处理时会造成一些麻烦。

转换编码

大多数编辑器带此功能。以 Visual Studio Code 为例:

  1. 点状态栏的编码部分
  2. 如果打开的时候就有乱码,先选择“通过编码重新打开”,再选择可能的编码,如果正常,再继续
  3. 选择“通过编码保存”
  4. 选择需要存为的编码

Visual Studio Code 转换编码

Python 读 CSV

Python 有读写 CSV 的标准库 csv

一种读取方式是用 reader 函数读取,结果是一个 _csv.reader 对象,其可迭代。迭代结果中,每一行为列表,其中每一项为字符串,表示该行各列的值。

这种读取方式不会考虑是否有表头,表头会被当做第一行。

>>> import csv
>>> f = open('./test_data.csv', encoding='utf-8')
>>> f
<_io.TextIOWrapper ...>
>>> f_csv = csv.reader(f)
>>> f_csv
<_csv.reader at 0x1a5f711e7a0>
>>> for row in f_csv:
...     print(row)
['desc', 'completion_date', '缺失1', '缺失2', '缺失3', '缺失4', '改善1', '改善2', '改善3', '改善4', '逾期1', '逾期2', '逾期3', '逾期4']
['初始', '', '3', '0', '1', '1', '0', '0', '0', '0', '0', '0', '0', '0']
['13: 事业群1, D4.1, \n一般, 延期', '2023/1/1 0:00', '3', '0', '"1', '1', '0', '0', '0', '0', '1', '0', '0', '0']
['12: 事业群2, D4.1, ""主要"", 延期', '2023/1/1 0:00', '3', '0', '1', '1', '0', '0', '0', '0', '1', '0', '0', '0']
['11: 事业群1, D4.1, 关键, 关闭', '2020/1/1 0:00', '3', '0', '1', '1', '1', '0', '0', '0', '1', '0', '0', '0']
...

另一种读取方式为创建 DictReader 类,可迭代。

迭代结果中,每一行为字典。键为第一行各列值,即表头;值为各列值。

这种读取方式,第一行为表头。

1
2
3
4
5
6
7
8
9
>>> f = open('./test_data.csv', encoding='utf-8')
>>> reader = csv.DictReader(f)
>>> for row in reader:
...:    print(row)
{'desc': '初始', 'date': '', '缺失1': '3', '缺失2': '0', '缺失3': '1', '缺失4': '1', '改善完成1': '0', '改善2': '0', '改善3': '0', '改善4': '0', '逾期1': '0', '逾期2': '0', '逾期3': '0', '逾期4': '0'}
{'desc': '13: 事业群1, D4.1, \n一般, 延期', 'date': '2023/1/1 0:00', '缺失1': '3', '缺失2': '0', '缺失3': '"1', '缺失4': '1', '改善1': '0', '改善2': '0', '改善3': '0', '改善4': '0', '逾期1': '1', '逾期2': '0', '逾期3': '0', '逾期4': '0'}
{'desc': '12: 事业群2, D4.1, ""主要"", 延期', 'date': '2023/1/1 0:00', '缺失1': '3', '缺失2': '0', '缺失3': '1', '缺失4': '1', '改善1': '0', '改善2': '0', '改善3': '0', '改善4': '0', '逾期1': '1', '逾期2': '0', ' 逾期3': '0', '逾期4': '0'}
{'desc': '11: 事业群1, D4.1, 关键, 关闭', 'date': '2020/1/1 0:00', '缺失1': '3', '缺失2': '0', '缺失3': '1', '缺失4': '1', '改善1': '1', '改善2': '0', '改善3': '0', '改善4': '0', '逾期1': '1', '逾期2': '0', '逾期3': '0', '逾期4': '0'}
...

CSV 文件转为以 Python 字典格式为项目的列表(不考虑错误处理等情况):

1
2
3
4
5
6
7
import csv


def read_csv_to_dict_list(file_path, **kwargs):
    with open(file_path, 'r', **kwargs) as f:
        reader = csv.DictReader(f)
    return [row for row in reader]

Python 写 CSV

写 CSV 时,要确保打开文件时定义参数 newline='',否则每写一行都会多一个空行。

使用 write 函数创建一个对象 _csv.writer,用它的 writerowwriterows 方法写入行(前者为单行写入,后者为多行写入)。

写入行时,参数需可迭代。

1
2
3
4
5
6
7
8
9
>>> import csv
>>> f = open('./test.csv', 'a', newline='', encoding='utf-8')
>>> writer = csv.writer(f)
>>> writer.writerow(['name', 'score'])
12
>>> writer.writerow(['ding', '150'])
10
>>> writer.writerows([['jun', '130'], ['yao', 100]])
>>> f.close()
生成的文件内容
1
2
3
4
name,score
ding,150
jun,130
yao,100

Question

如果要更改 CSV 中某一行某一列的值,怎么做?

INI

initialization

格式示例

INI 是非正式标准,其变体非常多。

一般分若干节,每节有若干键值对,键和值之间用半角冒号或等号隔开,可用空格使文本美观。

INI 文件中的节、键、值
INI 文件中的节、键、值

存储的是二维及以下的数据。

常用于记录配置(MySQL、PHP)。

[DEFAULT]
ServerAliveInterval = 45
Compression = yes
CompressionLevel = 9
ForwardX11 = yes

[bitbucket.org]
User = hg

[topsecret.server.com]
Port = 50022
ForwardX11 = no
[Simple Values]
key=value
spaces in keys=allowed
spaces in values=allowed as well
spaces around the delimiter = obviously
you can also use : to delimit keys from values

[All Values Are Strings]
values like this: 1000000
or this: 3.14159265359
are they treated as numbers? : no
integers, floats and booleans are held as: strings
can use the API to get converted values directly: true

[Multiline Values]
chorus: I'm a lumberjack, and I'm okay
    I sleep all night and I work all day

[No Values]
key_without_value
empty string value here =

[You can use comments]
# like this
; or this

# By default only in an empty line.
# Inline comments can be harmful because they prevent users
# from using the delimiting characters as parts of values.
# That being said, this can be customized.

    [Sections Can Be Indented]
        can_values_be_as_well = True
        does_that_mean_anything_special = False
        purpose = formatting for readability
        multiline_values = are
            handled just fine as
            long as they are indented
            deeper than the first line
            of a value
        # Did I mention we can indent comments, too?

Python 读 INI

使用标准库 configparser,使用其中的 ConfigParser 类实现读写。其尽可能为许多变体进行了适配。

节区分大小写,键不区分大小写。

DEFAULT 节可以配置各节的默认值。

任何情况下,值都被存储为字符串。

  • 未定义的值存储为空字符串。
  • 对于布尔值含义的文本,可以对节用 getboolean(键) 方法转换为布尔值。
  • 对于整数和浮点数,除直接转换外,也可以相应地用 getint()getfloat() 方法。
./test.ini
[DEFAULT]
ServerAliveInterval = 45
Compression = yes
CompressionLevel = 9
ForwardX11 = yes

[bitbucket.org]
User = hg

[topsecret.server.com]
Port = 50022
ForwardX11 = no
>>> import configparser
>>> config = configparser.ConfigParser()
>>> config.read('./test.ini')
['./test.ini']
>>> config.sections()
['bitbucket.org', 'topsecret.server.com']
>>> config['DEFAULT']
<Section: DEFAULT>
>>> for key in config['topsecret.server.com']:
...     print(key, config['topsecret.server.com'][key])
port 50022
forwardx11 no
serveraliveinterval 45
compression yes
compressionlevel 9
>>> config['topsecret.server.com']['serveraliveinterval']
'45'
>>> config['topsecret.server.com'].getboolean('forwardx11')
False

可以读多个配置,有冲突的键会被新的覆盖掉。

如果新读入默认配置,则会同步更改其他节的对应配置,但节内此前配置过的除外。

>>> config['topsecret.server.com']['Port']
'50022'
>>> config.read_string("[topsecret.server.com]\nPort=48484")
['bitbucket.org', 'topsecret.server.com']
>>> config['topsecret.server.com']['Port']
'48484'
>>> config.read_dict({"topsecret.server.com": {"Port": 21212}})
>>> config['topsecret.server.com']['Port']
'21212'
>>> config.read('./test2.ini')
['./test2.ini']
>>> for k in config['topsecret.server.com']:
...    print(k, config['topsecret.server.com'][k])
...
port 21212
forwardx11 no
compressionlevel 3
serveraliveinterval 11
compression no

覆盖过程

test.ini
[DEFAULT]
ServerAliveInterval = 45
Compression = yes
CompressionLevel = 9
ForwardX11 = yes

[bitbucket.org]
User = hg

[topsecret.server.com]
Port = 50022
ForwardX11 = no
  1. 初次从文件名读入

    1
    2
    3
    import configparser
    config = configparser.ConfigParser()
    config.read('./test.ini')
    
    当前 config 相当配置
    [DEFAULT]
    ServerAliveInterval = 45
    Compression = yes
    CompressionLevel = 9
    ForwardX11 = yes
    
    [bitbucket.org]
    User = hg
    ServerAliveInterval = 45
    Compression = yes
    CompressionLevel = 9
    ForwardX11 = yes
    
    [topsecret.server.com]
    Port = 50022
    ForwardX11 = no
    ServerAliveInterval = 45
    Compression = yes
    CompressionLevel = 9
    
  2. 从字符串读入

    config.read_string("[topsecret.server.com]\nPort=48484")
    
    读入的语句
    [topsecret.server.com]
    Port = 48484
    
    当前 config 相当配置
    [DEFAULT]
    ServerAliveInterval = 45
    Compression = yes
    CompressionLevel = 9
    ForwardX11 = yes
    
    [bitbucket.org]
    User = hg
    ServerAliveInterval = 45
    Compression = yes
    CompressionLevel = 9
    ForwardX11 = yes
    
    [topsecret.server.com]
    Port = 48484
    ForwardX11 = no
    ServerAliveInterval = 45
    Compression = yes
    CompressionLevel = 9
    
  3. 从字典读入

    config.read_dict({"topsecret.server.com": {"Port": 21212}})
    
    读入的语句
    [topsecret.server.com]
    Port = 21212
    
    当前 config 相当配置
    [DEFAULT]
    ServerAliveInterval = 45
    Compression = yes
    CompressionLevel = 9
    ForwardX11 = yes
    
    [bitbucket.org]
    User = hg
    ServerAliveInterval = 45
    Compression = yes
    CompressionLevel = 9
    ForwardX11 = yes
    
    [topsecret.server.com]
    Port = 21212
    ForwardX11 = no
    ServerAliveInterval = 45
    Compression = yes
    CompressionLevel = 9
    
  4. 再次从文件名读入

    config.read('./test2.ini')
    
    test2.ini
    1
    2
    3
    4
    5
    6
    7
    8
    [DEFAULT]
    ServerAliveInterval = 11
    Compression = no
    CompressionLevel = 1
    ForwardX11 = yes
    
    [topsecret.server.com]
    CompressionLevel = 3
    
    当前 config 相当配置
    [DEFAULT]
    ServerAliveInterval = 11
    Compression = no
    CompressionLevel = 1
    ForwardX11 = yes
    
    [bitbucket.org]
    User = hg
    ServerAliveInterval = 11
    Compression = no
    CompressionLevel = 1
    ForwardX11 = yes
    
    [topsecret.server.com]
    Port = 21212
    ForwardX11 = no
    ServerAliveInterval = 11
    Compression = no
    CompressionLevel = 3
    

Python 写入 INI

ConfigParser 类的 write 方法写入。

传入文件对象,模式需为 w

1
2
3
>>> cf = open('./test.ini', 'w', encoding='utf-8')
>>> config.write(cf)
>>> cf.close()
test.ini
[DEFAULT]
serveraliveinterval = 11
compression = no
compressionlevel = 1
forwardx11 = yes

[bitbucket.org]
user = hg

[topsecret.server.com]
port = 21212
forwardx11 = no
compressionlevel = 3

JSON

JavaScript Object Notation

格式示例

和 Python 的字典、字典组成的列表很像,不过引号必须是双引号。

可以不换行不缩进以缩减体积,也可以换行缩进以保证美观。

支持的数据类型:

  • 字符串
  • 数字
  • 布尔值
  • null
  • 对象(用大括号包裹)
  • 列表(用方括号包裹)

可以通过嵌套表达多维的数据。

常用于数据交换,也可用于记录配置(Docker)。

{
    "Image": {
        "Width": 800,
        "Height": 600,
        "Title": "View from 15th Floor",
        "Thumbnail": {
            "Url": "http://www.example.com/",
            "Height": 125,
            "Width": 100
        },
        "Animated": false,
        "IDs": [
            116,
            943,
            234,
            38793
        ]
    }
}
[
    {
        "precision": "zip",
        "Latitude": 37.7668,
        "Longitude": -122.3959,
        "Address": "",
        "City": "SAN FRANCISCO",
        "State": "CA",
        "Zip": "94107",
        "Country": "US"
    },
    {
        "precision": "zip",
        "Latitude": 37.371991,
        "Longitude": -122.026020,
        "Address": "",
        "City": "SUNNYVALE",
        "State": "CA",
        "Zip": "94085",
        "Country": "US"
    }
]

Python 将其他数据类型转为 JSON

Python 有标准库 json 以读写 JSON 字符串。

使用 json.dumps(字典或列表) 转为字符串。

使用 json.dump(字典或列表, 文件对象) 转到文件。

>>> import json
>>> d = [{'it1': '测试', 'it2': {'sub1': ['i1', '二']}}, {'ait': 'some'}]
>>> json.dumps(d)
'[{"it1": "\\u6d4b\\u8bd5", "it2": {"sub1": ["i1", "\\u4e8c"]}}, {"ait": "some"}]'
>>> print(json.dumps(d, indent=4, ensure_ascii=False))    # 美化输出,且不转换非 ASCII 字符
[
    {
        "it1": "测试",
        "it2": {
            "sub1": [
                "i1",
                "二"
            ]
        }
    },
    {
        "ait": "some"
    }
]
>>> f = open('t.json', 'w', encoding='utf-8')
>>> json.dump(d, f, indent=4, ensure_ascii=False)
>>> f.close()

Python 将 JSON 转为其他数据类型

使用 json.loads() 从字符串转。

使用 json.load() 从 IO(包括文件对象)转。

test.json
[{"it1": "测试", "it2": {"sub1": ["i1", "二"]}}, {"ait": "some"}]
1
2
3
4
5
6
7
>>> s = '[{"it1": "测试", "it2": {"sub1": ["i1", "二"]}}, {"ait": "some"}]'
>>> json.loads(s)
[{'it1': '测试', 'it2': {'sub1': ['i1', '二']}}, {'ait': 'some'}]
>>> f = open('./test.json', encoding='utf-8')
>>> json.load(f)
[{'it1': '测试', 'it2': {'sub1': ['i1', '二']}}, {'ait': 'some'}]
>>> f.close()

YAML

YAML Ain't Markup Language

格式示例

依靠缩进表达层级(嵌套)关系,一般是两个空格。

列表各项可以以 - 加上空格开头。

可以写注释。

可以用 --- 分段,将多个文档写到一个文件中。

常用于记录配置(Docker Compose)。

YAML: YAML Ain't Markup Language™

What It Is:
YAML is a human-friendly data serialization
language for all programming languages.

YAML Resources:
YAML Specifications:
- YAML 1.2:
    - Revision 1.2.2      # Oct 1, 2021 *New*
    - Revision 1.2.1      # Oct 1, 2009
    - Revision 1.2.0      # Jul 21, 2009
- YAML 1.1
- YAML 1.0
1
2
3
4
5
6
---
name: James
age: 20
---
name: Lily
age: 19

Python 将其他数据类型转为 YAML

需要安装第三方模块,如 PyYAML。

pip install yaml
>>> d = [{"it1": "测试", "it2": {"sub1": ["i1", "二"]}}, {"ait": "some"}]
>>> yaml.dump(d)
'- it1: "\\u6D4B\\u8BD5"\n  it2:\n    sub1:\n    - i1\n    - "\\u4E8C"\n- ait: some\n'
>>> print(yaml.dump(d, allow_unicode=True))
- it1: 测试
  it2:
    sub1:
    - i1
    - 
- ait: some

直接写入文件:

1
2
3
>>> f = open('test.yml', 'a', encoding='utf-8')
>>> yaml.dump(d, f, allow_unicode=True)
>>> f.close()

将多条数据转为 YAML 字符串(这时字符串会包含多段;也可以转为文件):

1
2
3
4
>>> d2 = [{"it1": "测试2", "it2": {"sub2": ["i1", "san"]}}, {"ait2": "some2"}]
>>> f = open('test2.yml', 'a', encoding='utf-8')
>>> yaml.dump_all([d, d2], f, allow_unicode=True)
>>> f.close()
test2.yml
- it1: 测试
  it2:
    sub1:
    - i1
    - 
- ait: some
---
- it1: 测试2
  it2:
    sub2:
    - i1
    - san
- ait2: some2

Python 将单段 YAML 转为其他数据类型

可以用 yaml.load() 处理,但要传入 Loader 参数。也可以直接使用 yaml.safe_load()

可以传入文件对象。

>>> import pprint
>>> s = """YAML: YAML Ain't Markup Language™

What It Is:
  YAML is a human-friendly data serialization
  language for all programming languages.

YAML Resources:
  YAML Specifications:
  - YAML 1.2:
    - Revision 1.2.2      # Oct 1, 2021 *New*
    - Revision 1.2.1      # Oct 1, 2009
    - Revision 1.2.0      # Jul 21, 2009
  - YAML 1.1
  - YAML 1.0"""
>>> pprint.pprint(yaml.safe_load(s))
{'What It Is': 'YAML is a human-friendly data serialization language for all '
               'programming languages.',
 'YAML': "YAML Ain't Markup Language™",
 'YAML Resources': {'YAML Specifications': [{'YAML 1.2': ['Revision 1.2.2',
                                                          'Revision 1.2.1',
                                                          'Revision 1.2.0']},
                                            'YAML 1.1',
                                            'YAML 1.0']}}

Python 将多段 YAML 转为其他数据类型

可以用 yaml.load_all() 处理,但要传入 Loader 参数。也可以直接使用 yaml.safe_load_all()

可以传入文件对象。

1
2
3
4
5
6
7
>>> f = open('./test2.yml', 'r', encoding='utf-8')  # 参考“Python 将其他数据类型转为 YAML”中的 test2.yml
>>> y = yaml.safe_load_all(f)
>>> for data in y:
...     print(data)
...
[{'it1': '测试', 'it2': {'sub1': ['i1', '二']}}, {'ait': 'some'}]
[{'it1': '测试2', 'it2': {'sub2': ['i1', 'san']}}, {'ait2': 'some2'}]

TOML

Tom 的(语义)明显、(配置)最小化的语言(Tom's Obvious, Minimal Language)

格式示例

样式很像 INI,但支持的功能更多。

不允许不写值。

详细的语法:https://toml.io/cn/v1.0.0

常用于记录配置。

# 注释
title = "TOML Example"
[owner]
name = "Tom Preston-Werner"
dob = 1979-05-27T07:32:00-08:00 # 时间
[database]
server = "192.168.1.1"
ports = [ 8000, 8001, 8002 ]
connection_max = 5000
enabled = true
[servers]
# 可以缩进,但不必要
[servers.alpha]
ip = "10.0.0.1"
dc = "eqdc10"
[servers.beta]
ip = "10.0.0.2"
dc = "eqdc10"
[clients]
data = [ ["gamma", "delta"], [1, 2] ]
# 数组内可以缩进
hosts = [
"alpha",
"omega"
]
[[products]]
name = "Hammer"
sku = 738594937
[[products]]  # 数组里的空表
[[products]]
name = "Nail"
sku = 284758393
color = "gray"

[[fruits]]
name = "apple"
[fruits.physical]  # 子表
color = "red"
shape = "round"
[[fruits.varieties]]  # 嵌套表数组
name = "red delicious"
[[fruits.varieties]]
name = "granny smith"
[[fruits]]
name = "banana"
[[fruits.varieties]]
name = "plantain"
1
2
3
4
5
6
7
apple.type = "水果"
apple.skin = "薄"
apple.color = "红"

orange.type = "水果"
orange.skin = "厚"
orange.color = "红"

Python 将 TOML 转为字典

Info

新版的 Python 有处理 TOML 的标准库,编写该教程的时候,还没有。

pytomlpp 库为例:

pip install pytomlpp

从字符串读可以使用 pytomlpp.loads()

>>> import pytomlpp
>>> from pprint import pprint
>>> pprint(pytomlpp.loads("""# 这是一个 TOML 文档
title = "TOML 示例"
[owner]
name = "Tom Preston-Werner"
dob = 1979-05-27T07:32:00-08:00
[database]
enabled = true
ports = [ 8000, 8001, 8002 ]
data = [ ["delta", "phi"], [3.14] ]
temp_targets = { cpu = 79.5, case = 72.0 }
[servers]
[servers.alpha]
ip = "10.0.0.1"
role = "前端"
[servers.beta]
ip = "10.0.0.2"
role = "后端"
"""))
{'database': {'data': [['delta', 'phi'], [3.14]],
              'enabled': True,
              'ports': [8000, 8001, 8002],
              'temp_targets': {'case': 72.0, 'cpu': 79.5}},
 'owner': {'dob': datetime.datetime(1979, 5, 27, 7, 32, tzinfo=datetime.timezone(datetime.timedelta(days=-1, seconds=57600))),
           'name': 'Tom Preston-Werner'},
 'servers': {'alpha': {'ip': '10.0.0.1', 'role': '前端'},
             'beta': {'ip': '10.0.0.2', 'role': '后端'}},
 'title': 'TOML 示例'}

从文件读可以用 pytomlpp.load(),传入文件对象:

test.toml
# 这是一个 TOML 文档
title = "TOML 示例"
[owner]
name = "Tom Preston-Werner"
dob = 1979-05-27T07:32:00-08:00
[database]
enabled = true
ports = [ 8000, 8001, 8002 ]
data = [ ["delta", "phi"], [3.14] ]
temp_targets = { cpu = 79.5, case = 72.0 }
[servers]
[servers.alpha]
ip = "10.0.0.1"
role = "前端"
[servers.beta]
ip = "10.0.0.2"
role = "后端"
>>> f = open('test.toml', encoding='utf-8')
>>> pprint(pytomlpp.load(f))
{'database': {'data': [['delta', 'phi'], [3.14]],
              'enabled': True,
              'ports': [8000, 8001, 8002],
              'temp_targets': {'case': 72.0, 'cpu': 79.5}},
 'owner': {'dob': datetime.datetime(1979, 5, 27, 7, 32, tzinfo=datetime.timezone(datetime.timedelta(days=-1, seconds=57600))),
           'name': 'Tom Preston-Werner'},
 'servers': {'alpha': {'ip': '10.0.0.1', 'role': '前端'},
             'beta': {'ip': '10.0.0.2', 'role': '后端'}},
 'title': 'TOML 示例'}
>>> f.close()

Python 将字典转为 TOML

转为字符串用 pytomlpp.dumps(字典);转为文件用 pytomlpp.dump(字典, 文件对象)

1
2
3
4
5
6
>>> d = {'it1': '测试', 'it2': {'sub1': ['i1', '二']}}
>>> pytomlpp.dumps(d)
"it1 = '测试'\n\n[it2]\nsub1 = [ 'i1', '二' ]"
>>> f = open('t.toml', 'w', encoding='utf-8')
>>> pytomlpp.dump(d, f)
>>> f.close()
t.toml
1
2
3
4
it1 = '测试'

[it2]
sub1 = [ 'i1', '二' ]

XML

可扩展标记语言(EXtensible Markup Language)

格式示例

与 HTML 类似,不过可以自定义标签名、属性等。

以前常用于数据交换,现在也用于记录配置(Maven)。

<?xml version="1.0" encoding="utf-8"?>
<nitf type="break_news">
    <head>
        <title>Colombia Earthquake</title>
    </head>
    <body type="short">
        <headline>
            <hl1>143 Dead in Colombia Earthquake</hl1>
        </headline>
        <byline>
            <bytag>By Jared Kotler, Associated Press Writer</bytag>
        </byline>
        <dateline>
            <location>Bogota, Colombia</location>
            <date timezone="CST">1999-01-25 07:28</date>
        </dateline>
    </body>
</nitf>

Python 解析 XML

Python 标准库提供有 xml,用于解析 XML,但如果 XML 有恶意代码,可能会存在安全问题。Python 官方文档推荐使用第三方的 defusedxml 模块替代,以提高安全性。

XML 的解析可以使用 DOM、SAX 和 ElementTree API 三种方法,这里只介绍 ElementTree API 的简单的方法。

使用 defusedxml.ElementTree.parse() 解析:

test.xml
<?xml version="1.0" encoding="utf-8"?>
<nitf type="break_news">
    <head>
        <title>Colombia Earthquake</title>
    </head>
    <body type="short">
        <headline>
            <hl1>143 Dead in Colombia Earthquake</hl1>
        </headline>
        <byline>
            <bytag>By Jared Kotler, Associated Press Writer</bytag>
        </byline>
        <dateline>
            <location>Bogota, Colombia</location>
            <date timezone="CST">1999-01-25 07:28</date>
        </dateline>
    </body>
</nitf>
>>> from defusedxml.ElementTree import parse
>>> et = parse('test.xml')
>>> root = et.getroot()
>>> root.tag
'nitf'
>>> for child in root:
...     print(child.tag, child.attrib)
head {}
body {'type': 'short'}
>>> root[0][0].text
'Colombia Earthquake'
>>> root[1][2][1].tag
'date'
>>> root[1][2][1].attrib
{'timezone': 'CST'}
>>> root[1][2][1].text
'1999-01-25 07:28'

展示解析的各部分出处
展示解析的各部分出处

使用 defusedxml.ElementTree.parse(文件路径或文件对象) 解析为 ElementTree 对象,再对其使用 getroot() 方法获得 Element 对象。

使用 defusedxml.ElementTree.fromstring(字符串) 解析为 Element 对象。

Element 对象使用 find(XPath) 方法,返回第一个符合条件的对象。

使用 findall(XPath) 方法,返回所有符合条件的对象组成的列表。

使用 iter(标签名) 方法,可以生成一个生成器,可迭代所有为这个标签名的对象。

test2.xml
<?xml version="1.0" encoding="utf-8"?>
<nitf type="break_news">
    <news>
        <head>
            <title>Colombia Earthquake</title>
        </head>
        <body type="short">
            <headline>
                <hl1>143 Dead in Colombia Earthquake</hl1>
            </headline>
            <byline>
                <bytag>By Jared Kotler, Associated Press Writer</bytag>
            </byline>
            <dateline>
                <location>Bogota, Colombia</location>
                <date timezone="CST">1999-01-25 07:28</date>
            </dateline>
        </body>
    </news>
    <news>
        <head>
            <title>UFO decectived</title>
        </head>
        <body type="short">
            <headline>
                <hl1>USAF reported</hl1>
            </headline>
            <byline>
                <bytag>By Jared Kotler, Associated Press Writer</bytag>
            </byline>
            <dateline>
                <location>Pentagon, US</location>
                <date timezone="CST">2000-01-25 07:28</date>
            </dateline>
        </body>
    </news>
</nitf>
>>> et = parse('test2.xml')
>>> root = et.getroot()
>>> root.find('news')
<Element 'news' at 0x000001820E4636F0>
>>> root.findall('news')
[<Element 'news' at 0x000001820E4636F0>, <Element 'news' at 0x000001820E47E340>]
>>> date_node = root.findall('news')[0].find('body').find('dateline').find('date')
    # 相当于 root.find('./news[1]//date')
>>> date_node.attrib
{'timezone': 'CST'}
>>> date_node.text
'1999-01-25 07:28'

Python 写入 XML

可以对 ElementTreeElement 对象进行新增、修改、删除等操作。

一些操作需要 xml 模块下的包。

>>> from xml.etree.ElementTree import Element, SubElement, dump
>>> for el in root.iter('date'):
...     el.set('offset', '8')
...
>>> root.find('./news[1]//date').text = 'UNDEFINED'
>>> root.find('./news[1]//date').tag = 'hahaha'
>>> root.find('./news[2]//dateline').remove(root.find('./news[2]//location'))
>>> root.append(Element('note'))
>>> root.find('note').text = 'Some note...'
>>> SubElement(root.find('note'), 'author')
<Element 'author' at 0x00000130C5666200>
>>> root.find('note/author').attrib['dept'] = 'news'
>>> root.find('note/author').text = 'ding'
>>> dump(root)
<nitf type="break_news">
    <news>
        <head>
            <title>Colombia Earthquake</title>
        </head>
        <body type="short">
            <headline>
                <hl1>143 Dead in Colombia Earthquake</hl1>
            </headline>
            <byline>
                <bytag>By Jared Kotler, Associated Press Writer</bytag>
            </byline>
            <dateline>
                <location>Bogota, Colombia</location>
                <hahaha timezone="CST" offset="8">UNDEFINED</hahaha>
            </dateline>
        </body>
    </news>
    <news>
        <head>
            <title>UFO decectived</title>
        </head>
        <body type="short">
            <headline>
                <hl1>USAF reported</hl1>
            </headline>
            <byline>
                <bytag>By Jared Kotler, Associated Press Writer</bytag>
            </byline>
            <dateline>
                <date timezone="CST" offset="8">2000-01-25 07:28</date>
            </dateline>
        </body>
    </news>
<note>Some note...<author dept="news">ding</author></note></nitf>
>>> et.write('modified.xml')

使用 xmltodict 实现 XML 与字典互换

xmltodict 是第三方模块。

xmltodict.parse(字符串或文件对象) 可以将 XML 转换为字典。

  • 如果传入文件对象,需确保以二进制形式打开。
  • 默认情况下,如果有参数,则会成为标签下的键,键为 @ 加上参数名;这种情况下,如果有文本,则会成为标签下的键,键为 #text
>>> import xmltodict
>>> f = open('test2.xml', 'rb') # 参考“Python 解析 XML”中的 test2.xml
>>> d = xmltodict.parse(f)
>>> from pprint import pprint
>>> pprint(d)
{'nitf': {'@type': 'break_news',
          'news': [{'body': {'@type': 'short',
                             'byline': {'bytag': 'By Jared Kotler, Associated '
                                                 'Press Writer'},
                             'dateline': {'date': {'#text': '1999-01-25 07:28',
                                                   '@timezone': 'CST'},
                                          'location': 'Bogota, Colombia'},
                             'headline': {'hl1': '143 Dead in Colombia '
                                                 'Earthquake'}},
                    'head': {'title': 'Colombia Earthquake'}},
                   {'body': {'@type': 'short',
                             'byline': {'bytag': 'By Jared Kotler, Associated '
                                                 'Press Writer'},
                             'dateline': {'date': {'#text': '2000-01-25 07:28',
                                                   '@timezone': 'CST'},
                                          'location': 'Pentagon, US'},
                             'headline': {'hl1': 'USAF reported'}},
                    'head': {'title': 'UFO decectived'}}]}}

xmltodict.unparse(字典) 可以将字典转换为 XML。对字典格式有要求。

>>> j = """{
    "root": {
            "location": [
                {
                    "precision": "zip",
                    "Latitude": 37.7668,
                    "Longitude": -122.3959,
                    "Address": "",
                    "City": "SAN FRANCISCO",
                    "State": "CA",
                    "Zip": "94107",
                    "Country": "US"
                },
                {
                    "precision": "zip",
                    "Latitude": 37.371991,
                    "Longitude": -122.026020,
                    "Address": "",
                    "City": "SUNNYVALE",
                    "State": "CA",
                    "Zip": "94085",
                    "Country": "US"
                }
            ]
        }
}
"""
>>> print(xmltodict.unparse(json.loads(j)))
<?xml version="1.0" encoding="utf-8"?>
<root><location><precision>zip</precision><Latitude>37.7668</Latitude><Longitude>-122.3959</Longitude><Address></Address><City>SAN FRANCISCO</City><State>CA</State><Zip>94107</Zip><Country>US</Country></location><location><precision>zip</precision><Latitude>37.371991</Latitude><Longitude>-122.02602</Longitude><Address></Address><City>SUNNYVALE</City><State>CA</State><Zip>94085</Zip><Country>US</Country></location></root>

总结

各文件格式的样式
各文件格式的样式

文件格式 CSV INI JSON YAML TOML XML
使用的模块 csv configparser json yaml pytomlpp xml; defusedxml
是否是标准库 是;否
从数据读 .ConfigParser()
> .read_string(字符串).read_dict(字典)
.loads(字符串)
→ 字典、列表等
.safe_load(字符串)
→ 字典、列表等
.loads(字符串)
→ 字典
.ElementTree.fromstring(字符串)
Element
从文件读(里面的“流”可以用文件对象指代) .reader(流)
.DictReader(流)
.ConfigParser()
>.read(文件名)
.loads(流)
→ 字典、列表等
.safe_load(流)
→ 字典、列表等
.load(流)
→ 字典
.ElementTree.parse(文件路径或流)
ElementTree
写到数据 .dumps(字典或列表, ...)
→ 字符串
.dump(字典或列表, ...)
→ 字符串
.dumps(字典)
→ 字符串
xml.etree.ElementTree.dump()
→ 字符串
写到文件(里面的“流”可以用文件对象指代) .writer(流)
> .writerow(一行的列表)
.writerows(包含各行的列表)
.ConfigParser()
> .write(流)
.dump(字典或列表,流, ...) .dump(字典或列表,流, ...) .dump(字典, 流) .ElementTree.parse()
> .write(文件路径或流)

参考资料