pytest 测试框架基础
约 837 个字 217 行代码 9 张图片 预计阅读时间 6 分钟
安装
最简单的例子
| 目录结构 |
|---|
| .(Z:\code\pytest_playground)
test_example.py
|
| test_example.py |
|---|
| def test_1():
assert 1 == 1
def test_2():
assert 1 == 2
|
测试用例所在文件名要以 test_ 开头,或以 _test 结尾(不考虑扩展名)。
测试用例函数要以 test 开头。
使用 assert (断言)语句验证结果是否符合要求。
断言
如果语句为假,则抛出 AssertionError。
如果想在抛出异常时添加自定义的提示信息,可以这么写:
执行测试
| PS Z:\code\pytest_playground> pytest
======================= test session starts ========================
platform win32 -- Python 3.10.5, pytest-7.1.2, pluggy-1.0.0
rootdir: Z:\code\pytest_playground
plugins: forked-1.4.0, html-3.1.1, metadata-2.0.1, repeat-0.9.1, rerunfailures-10.2, xdist-2.5.0
collected 2 items
test_example.py .F [100%]
============================= FAILURES =============================
______________________________ test_2 ______________________________
def test_2():
> assert 1 == 2
E assert 1 == 2
test_example.py:5: AssertionError
===================== short test summary info ======================
FAILED test_example.py::test_2 - assert 1 == 2
=================== 1 failed, 1 passed in 0.15s ====================
|
上例中有 2 个测试用例。
执行完成后,如果出现异常会显示 == FAILURES == 行,后面是具体的错误信息。
文件名后面显示的是每个测试用例的执行结果:
.:正常F:失败(一般是断言错误)E:出错(一般是有别的异常)
断言可以显示分部结果
| test_example.py |
|---|
| def inc(a, b):
return a + b
def test_1():
assert inc(inc(1, 2), inc(3, 4)) == inc(5, 6)
|
| PS Z:\code\pytest_playground> pytest
================= test session starts ==================
platform win32 -- Python 3.10.5, pytest-7.1.2, pluggy-1.0.0
rootdir: Z:\code\pytest_playground
plugins: forked-1.4.0, html-3.1.1, metadata-2.0.1, repeat-0.9.1, rerunfailures-10.2, xdist-2.5.0
collected 1 item
test_example.py F [100%]
======================= FAILURES =======================
________________________ test_1 ________________________
def test_1():
> assert inc(inc(1, 2), inc(3, 4)) == inc(5, 6)
E assert 10 == 11
E + where 10 = inc(3, 7)
E + where 3 = inc(1, 2)
E + and 7 = inc(3, 4)
E + and 11 = inc(5, 6)
test_example.py:11: AssertionError
=============== short test summary info ================
FAILED test_example.py::test_1 - assert 10 == 11
================== 1 failed in 0.19s ===================
|
如何通过执行脚本进行测试
| ./test_example.py |
|---|
| import pytest
def inc(a, b):
    return a + b

def test_1():
    assert inc(inc(1, 2), inc(3, 4)) == inc(5, 6)
if __name__ == '__main__':
pytest.main()
|
| PS Z:\code\pytest_playground> python ./test_example.py
================= test session starts ==================
platform win32 -- Python 3.10.5, pytest-7.1.2, pluggy-1.0.0
rootdir: Z:\code\pytest_playground
plugins: forked-1.4.0, html-3.1.1, metadata-2.0.1, repeat-0.9.1, rerunfailures-10.2, xdist-2.5.0
collected 1 item
test_example.py F [100%]
======================= FAILURES =======================
________________________ test_1 ________________________
def test_1():
> assert inc(inc(1, 2), inc(3, 4)) == inc(5, 6)
E assert 10 == 11
E + where 10 = inc(3, 7)
E + where 3 = inc(1, 2)
E + and 7 = inc(3, 4)
E + and 11 = inc(5, 6)
test_example.py:11: AssertionError
=============== short test summary info ================
FAILED test_example.py::test_1 - assert 10 == 11
================== 1 failed in 0.19s ===================
|
在 PyCharm 中使用
添加
-
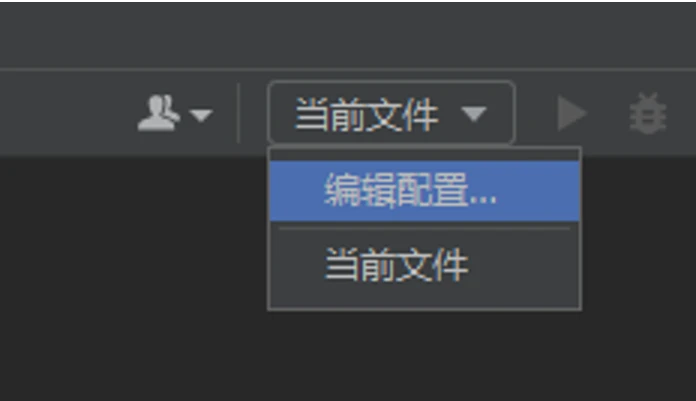
点右上方的配置栏,点“编辑配置...”
 编辑配置
编辑配置
-
在弹出的“运行/调试配置”中,点左边的加号,添加“Python 测试 → pytest”选项
 添加 pytest
-
如果没什么特殊需求,目标就直接选“自定义”
 目标选“自定义”
执行
-
配置栏中选择之前设置的那个配置,然后点右边的运行按钮
 点运行按钮
点运行按钮
-
之后就能够在下方的“运行”中看到执行结果。与命令行执行相比,默认开启了一些选项,有图形化界面,能够更好地分析测试结果
 查看执行结果
预期与实际
PyCharm 中,断言失败的时候会注明预期与实际。断言时,操作符左边的为实际,右边的为预期。
 断言失败注明预期与实际
点击以查看差异时,左边的为预期,右边的为实际:
 点击以查看差异时的画面
故断言时建议这么写:
| assert 程序执行结果之类的实际结果 操作符 预期结果
|
测试用例的参数化
@pytest.mark.parameterize()
例:对于前面的 inc(a, b) 函数,需要测试一些值的返回结果是否正确。
| a |
b |
预期 |
| 1 |
2 |
3 |
| 2 |
3 |
5 |
| 0 |
0 |
0 |
| -1 |
2 |
1 |
| -1 |
-2 |
-3 |
| ... |
... |
... |
如果使用普通的方法
| def inc(a, b):
return a + b
def test_1():
assert inc(1, 2) == 3
def test_2():
assert inc(2, 3) == 5
def test_3():
assert inc(0, 0) == 0
def test_4():
assert inc(-1, 2) == 1
...
|
费时费力,代码冗长。
| def inc(a, b):
return a + b
def test_1():
assert inc(1, 2) == 3
assert inc(2, 3) == 5
assert inc(0, 0) == 0
assert inc(-1, 2) == 1
...
|
费时费力,代码冗长;一旦一个断言失败,后面都不会执行。
| def inc(a, b):
return a + b
def test_1():
test_list = [
(1, 2, 3), (2, 3, 5), (0, 0, 0),
(-1, 2, 1), ...
]
for a, b, r in
assert inc(a, b) == r
|
一旦一个断言失败,后面都不会执行。
@pytest.mark.parameterize()
首先导入 pytest 模块。
该函数作为装饰器放在所需函数前:
| @pytest.mark.parameterize(以逗号分隔的各参数名称构成的字符串, 各参数构成的二维结构)
def test_xxx(参数1, 参数2, ...):
...
# 如
@pytest.mark.parametrize("test_input,expected", [("3+5", 8), ("2+4", 6), ("6*9", 42)])
def test_eval(test_input, expected):
assert eval(test_input) == expected
|
故前例可写为:
| import pytest
def inc(a, b):
return a + b
@pytest.mark.parametrize(
"a,b,r",
[
(1, 2, 3), (2, 3, 5),
(0, 0, 0), (-1, 2, 1), ...
]
)
def test_1(a, b, r):
assert inc(a, b) == r
|
| PS Z:\code\pytest_playground> pytest
========================== test session starts ==========================
platform win32 -- Python 3.10.5, pytest-7.1.2, pluggy-1.0.0
rootdir: Z:\code\pytest_playground
plugins: forked-1.4.0, html-3.1.1, metadata-2.0.1, repeat-0.9.1, rerunfailures-10.2, xdist-2.5.0
collected 4 items
test_example.py .... [100%]
=========================== 4 passed in 0.14s ===========================
|
 上例在 PyCharm 中的运行结果
练习
如果前例给的是一个 CSV 文件,如何进行参数化?
| test.csv |
|---|
| a,b,r
1,2,3
2,3,5
0,0,0
-1,2,1
-1,-2,-3
|
参考答案
| import csv
import pytest
def inc(a, b):
return a + b
def csv_to_param():
with open('./test.csv', encoding='utf-8') as f:
f_csv = list(csv.reader(f))
return ','.join(f_csv[0]), \
[tuple([int(val) for val in row]) for row in f_csv[1:]]
@pytest.mark.parametrize(*csv_to_param())
def test_1(a, b, r):
assert inc(a, b) == r
|
测试项目结构
这里介绍的是被测试对象非本地 Python 项目的结构。
| ./
# 放一些测试用的类和函数,文件的名称尽量避免 test_ 开头或 _test.py 结尾
tests/
# 测试文件可以放到目录中,用来区分测试的部分,名字没什么讲究的,能让人看懂就行/
conftest.py # 配置一些统一的配置项,之后讲
test_# 这是测试文件.py
...
.gitignore # 用 Git 时定义哪些文件不同步,以免同步缓存等文件
README.md # 项目的介绍
requirements.txt # 项目用了哪些模块
|
 一些项目结构示例
.gitignore
使用 Git 做版本管理时,可配置该文件,防止一些文件被同步。
Python 项目在运行时会生成一些缓存文件,如 __pycache__、.pytest_cache 目录。测试报告之类的文件比较大,也不建议同步。
基本格式可以参考 https://github.com/github/gitignore。
| 示例 |
|---|
| # Byte-compiled / optimized / DLL files
__pycache__/
*.py[cod]
*$py.class
*.so
.idea/
report/
test_jsons/
data/
|
requirements.txt
该文件列举项目所需 Python 模块,也可以指定版本。
一行一个模块。
由于 pytest 及其插件往往不会在代码中调用,故使用 pytest 时,务必附上所需模块。
| 示例 |
|---|
| python-dateutil
pymssql
pandas
pytest
pytest-xdist
requests
pytest-rerunfailures
pytest-html
|
使用命令行时,执行以下命令安装这些模块:
| pip install -r requirements.txt
|
参考资料


